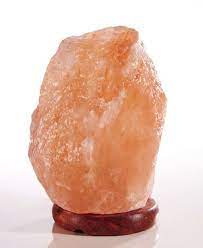
Himalayan Pink Salt Lamp
Build your own pink salt crystal lamp! By using authentic Himalayan pink salt, this lamp will be infused with the soothing powers of the Yeti.
Yield: 1 lamp
Cost: $25
Equipment
- Hammer and awl
- Electric Drill
- 1/4" + 3/4" drill bits
Materials
- 5-10 lb Authentic Himalayan Pink Salt Pink with flecks of red
- 1 Large Vessel wire or brass or otherwise open to air
- 1 Low wattage bulb >30 watts
- 6 ft socket and cord available at colorcord.com
Instructions
- Salt lamps can be made simply and in many fashions but require a few standard components. First, of course, is the large block of Himalayan Red Salt 5-10 lbs whose steps to obtaining we have previously laid out. Make sure the rock is handled with care and not damaged on the return journey home. Smaller bits of salt that would be classified as chunks, flakes, or grains will lose their unique properties. If the worst does occur and your blood salt is significantly damaged in transit, we at Surly Witches recommend transferring it to a course grinder and using it to top any fancy dishes for an added flair while plating.

- The next requirement will be a proper heat and light source. Traditionally, the sherpas use candles crafted from Yak fat but we have found that modern heat sources are acceptable in the form of low wattage filament bulbs. The low heat properties of LEDs fail to heat and activate the lamp and fluorescents are just unacceptable on principle. The closer to an antique style bulb in the style of Nikola Tesla, the better. Though more of a fire hazard, the more exposed and brighter burning the filament, the more powerful the lamp will be. Just remember our Surly Witches motto: “Ultimate power first, safety second!” You can find proper electrical sockets, plugs, cables and fittings by exploring abandoned lightbulb factories or by visiting your local hardware store or appropriate website.

- Thirdly, you need a Vessel for the lamp to inhabit. This can be a glass vase or a wire basket. The important thing is that it is hand crafted by the witch who is going to be casting spells through it, there are many creative possibilities for your personal witchy aesthetic. Enrolling in basket weaving or glass blowing courses at your local community college can assist greatly in this step.The only requirement is that it is heat resistant, so think of things you would use to contain or hold a candle. As examples, Gemini’s vessel is a shimmering collage of used tins from store-bought candle holders. It was broken apart, hammered into a basic shape, and glued together into its final form. Misty’s is a repurposed leather boot.

- Finally, you will need a high quality power drill with a full set of bits. We will note here that the sherpa who showed us how to make the lamp used a bone awl to grind, as is traditional. However, this method is deemed by us at Surly Witches to be much too tedious. From our experience, the use of modern tools did not affect the results.To Assemble: Feel the Red Salt Rock in your palms, visualizing where the bulb will fit inside. Imagine the salt in its final form. Utilize a ruler and make some markings with a drafting pencil if you do not feel confident free-handing it. Once you are ready, use a ¾” drill bit to carefully core out the cavity for your socket and bulb. The hole should come up from what will be the bottom of the rock and be deep enough to fit the entire bulb comfortably. Make sure to leave a ¼” hole for the power cord and air flow.
- Before final assembly, rinse the salt with a damp cloth using decanted sun-infused water. This will clean the surface as well as help bind the lamp in its finished state.

- Once all the parts are prepared connect the bulb and cord in the vessel and cover with your Bloody Yeti spit covered salt crystals. If it fails to hold its shape just use some clear silicone adhesive to slap that thing into shape.
- Alakazam! Your brand new Himalayan Salt Lamp is ready to begin healing your ails. Be sure to leave it on in a room you spend time in!
Notes
 Using the Product: Keep the lamp lit at all times in a comfortable place where it can clean and deodorize air. Drip some essential oils on top to magnify the cleansing power. With its pale warmth, and spirit of the mountains it will refresh your air, boost your blood flow, and reduce symptoms of asthma.